Am also doing up the designs on T-Shirts for hubby's wrestlers...CAN'T SHOW till the banquet those, so hold your breath on those, baby!
Am going to make a trip to the BIG CITY this weekend to get some more iron on interfacing for the knitting bags I am working up. I decided that wouldn't be against my decision to use what I have on hand since I can't really make more without it!
What are you up to for the weekend?
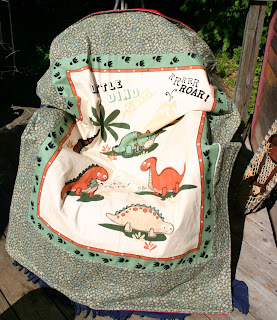
Having two grandsons is making for lots of new creative ideas. Here is a project idea I thought I would like to share for a waterproof picnic/play blanket. I posted it on my Facebook page and thought I'd pop the idea out here, as well!
Waterproof Picnic/Play BlanketYou need:
• Plastic table cloth (I found them on sale at Target)
• Fabric for top (I like flannel…basically for the feel and for the fact it “sticks” nicely to the flannel backed plastic table cloth!)
• Sewing machine & thread
1. Begin by deciding how large you want to make this. I started with a flannel panel, realized that wasn’t going to be big enough so I added flannel on each side to get to the size I wanted!
 2. If, like me, you are sewing several pieces together to create the top, be sure to keep ironing/pressing things for smoothness. ALSO, I used ½” seams and did a zigzag stitch to secure them before putting the blanket together.

3. Lay the top on the table cloth (I used just under ½ of a 60” x 80” tablecloth) with the right sides together.
4. Pin around the edges and cut off the bulk of table cloth, if you don’t need it.
5. Do LOTS of smoothing to be sure they stay lined up.
6. Sew one side. Stop. Go back to the table/floor and be sure your pinning is good and that the fabrics are still fitting together.
7. Go back and sew the other 3 sides, leaving a 6” opening to pull the blanket through.


8. I also chose to zigzag stitch the outside edges too, after sewing together and before turning.
9. Pull the right sides OUT through the opening. ****IF YOU DECIDE TO PRESS HERE BE SURE NOT TO TOUCH THE PLASTIC TABLECLOTH…YUP…PLASTIC MELTS!
10. Stitch around the whole blanket to close the 6” opening and to secure the edges.
11. I also did some decorative stitching in a couple of spots ACROSS the blanket, again, to secure it.

12. Viola! You are done!
If YOU decide to give this a try, send me pic! I'd love to see it!
Enjoy the day, all ~
Carrie
• Plastic table cloth (I found them on sale at Target)
• Fabric for top (I like flannel…basically for the feel and for the fact it “sticks” nicely to the flannel backed plastic table cloth!)
• Sewing machine & thread
1. Begin by deciding how large you want to make this. I started with a flannel panel, realized that wasn’t going to be big enough so I added flannel on each side to get to the size I wanted!


3. Lay the top on the table cloth (I used just under ½ of a 60” x 80” tablecloth) with the right sides together.
4. Pin around the edges and cut off the bulk of table cloth, if you don’t need it.
5. Do LOTS of smoothing to be sure they stay lined up.
6. Sew one side. Stop. Go back to the table/floor and be sure your pinning is good and that the fabrics are still fitting together.
7. Go back and sew the other 3 sides, leaving a 6” opening to pull the blanket through.


8. I also chose to zigzag stitch the outside edges too, after sewing together and before turning.
9. Pull the right sides OUT through the opening. ****IF YOU DECIDE TO PRESS HERE BE SURE NOT TO TOUCH THE PLASTIC TABLECLOTH…YUP…PLASTIC MELTS!
10. Stitch around the whole blanket to close the 6” opening and to secure the edges.
11. I also did some decorative stitching in a couple of spots ACROSS the blanket, again, to secure it.

12. Viola! You are done!

If YOU decide to give this a try, send me pic! I'd love to see it!
Enjoy the day, all ~
Carrie
No comments:
Post a Comment